
 MacOS computers")
Application used in running Odoo
Before you can run Odoo, you need to install Git, Python / Pip, PostgreSQL, PG Admin 4 and NodeJS. We will install PyCharm Community Edition as our IDE. Finally, we need any browser like Chrome, Firefox, Safari, etc.
We will use git commands to get the code of Odoo 15 community edition into our machine. To install git, copy the commands below and use terminal in your Mac. We will use HomeBrew so be sure to install it. Try these youtube videos if you have issues installing HomeBrew .
/bin/bash -c "$(curl -fsSL https://raw.githubusercontent.com/Homebrew/install/HEAD/install.sh)"
Now install git using the command below:
Using git command, copy the code of Odoo 15 community edition from GitHub . But before you do that, create the folder you want to save Odoo community. Let say we save it in this directory « /Users/alain/odoo/odoo/ ».Take note that macbookpro will be your Mac username.
Open your terminal and go inside that directory by using terminal. Type cd and click and drag odoo-server folder.
Copy the git command below, paste on your terminal and hit enter. It will take a little bit in copying the files depending on your internet speed.
git clone https://www.github.com/odoo/odoo --depth 1 --branch 16.0 .
Odoo is using Python as the main programming language. To install Python, go to Python website https://www.python.org/downloads/macos and select version higher than 3.7. In this tutorial, I will be using Python v3.8.0 . Go at the bottom and select macOS 64-bit installer. Kindly check this tutorial if you are having trouble installing it.
After installation, check your python version below. Take note that MacOS has default Python2.7 installed already.
python3 --version
By default, if you install python, pip3 will also be installed. We will use pip3 to download python packages needed for Odoo to run. If you know ReactJS, this is the same as npm. To check Odoo python packages, open Requirements.txt in odoo-server folder.
To check pip3 version, type the code below in terminal:
SH
pip3 --version
To download PostgreSQL, go to their website https://www.postgresql.org/download/ and choose the operating system you will use. In this tutorial, we will be using macOS so choose macOS.

There are several options how you will download PostgreSQL, select Postgress.app since this is a native macOS app. If you choose this option, you will be redirected to their website https://postgresapp.com/.
Go to Downloads and select installer with current or different versions. If you want to use other versions, choose Postgres.app with all currently supported versions (Universal/Intel).

In order to easily manage and access PostgreSQL, we need to install pgAdmin 4. Go to https://www.pgadmin.org/download/ to download pgAdmin 4, select the operating system and choose macOS.
In installing Odoo python dependencies, we need pip3. When installing python, pip3 will be automatically installed. To see all python dependencies, go to https://pypi.org/. To see all Odoo python dependencies, go inside odoo-server directory and open requirements.txt.
It is recommended to use virtual environment so that your python module packages will not be mixed up with other Odoo instances or python versions. To create virtual environment, first go to « /Users/macbookpro/tutorials/odoo/v15 » by typing cd in terminal, then click and drag v15 folder and hit enter.

Next, run the code below:
SH
python3 -m venv odoo_venv
After running the above code, a new folder odoo_venv will be created.

Next, activate the virtual environment by running the code below:
Next, activate the virtual environment by running the code below:
source odoo_venv/bin/activate
Install the python module packages by running the code below. Wait until all dependencies will be installed.
SH
pip3 install setuptools wheelpip3 install -r ./odoo/requirements.txt
Odoo offer several languages including Arabic/Hebrew. To support these, we need to install rtlcss using npm. To use npm, we need to install NodeJS. Go to https://nodejs.org/en/ and download version LTS (Long Term Support).
Now that all the applications needed are successfully installed, instead of using command-line, we will be using PyCharm community. But before that, make sure the PostgreSQL is running.

For security reason, we can not use default postgres user. To create a new user, open pgAdmin 4. For first time use, it might ask for password.
Go to Servers -> Localhost and right Login/Group Roles and select Create -> Login/Group Role…

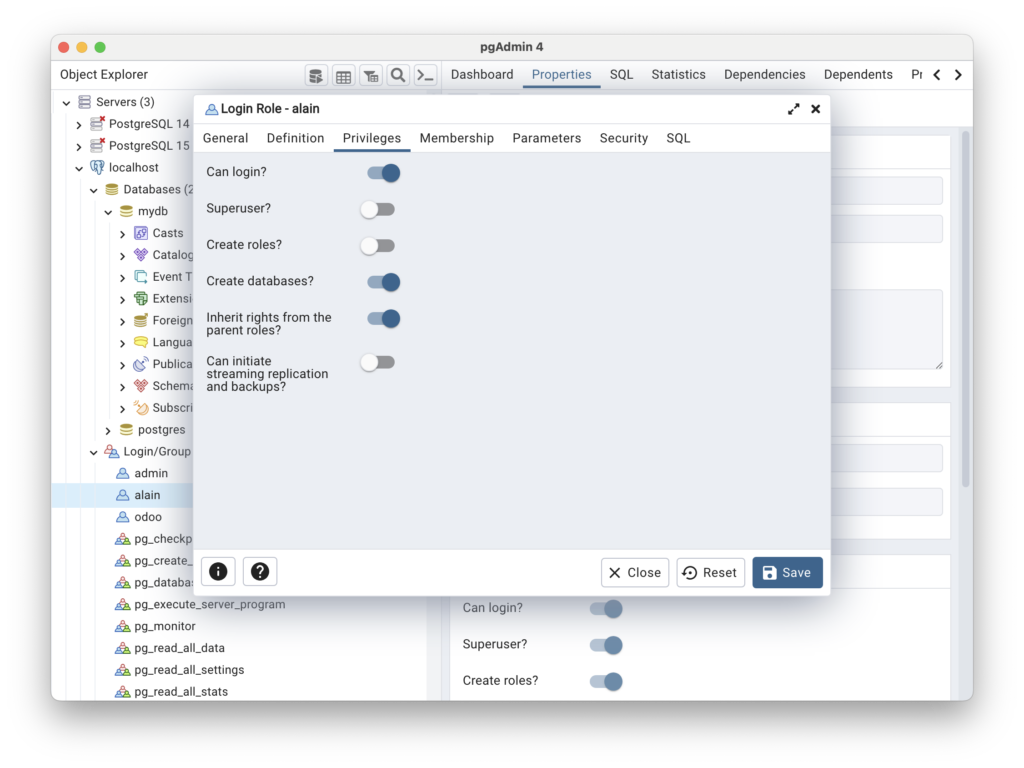
In General, type the name. Next add the password in definition. Lastly, under privileges, toggle Can Login and Create Databases. Click Save.

First, create a new folder under « Users/alain » and name it your_home since this will be the theme that we will create.

Download PyCharm community edition on this link .
Once downloaded, open PyCharm and choose Open and select the folder you created « your_home ».
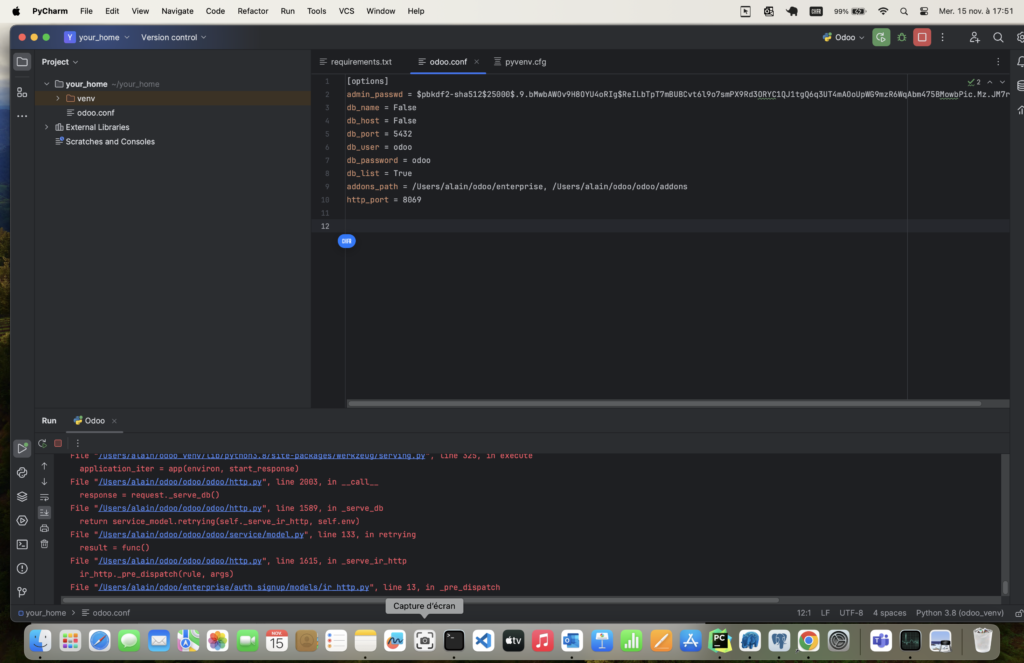
 Inside you_home folder, create Odoo configuration by creating a new file odoo.conf. Copy and paste the following code:
[options]
admin_passwd = 12345
db_host = False
db_port = False
db_user = ajs
db_password = ajs
dbfilter = ^your_home.*$
db_list = True
addons_path = /Users/alain/odoo/odoo/addons
http_port = 8069
Add virtual environment by going in PyCharm -> Preferences -> Project -> Python Interpreter. Check the link of current python interpreter and if this is not the one you created under /Users/alain/odoo/odoo/addons, then click gear icon on the right side and click Add.

Select Existing Environment and locate python3 file which is located inside « odoo_venv/bin/python3 ». Click apply and okay button.

Edit PyCharm configuration by clicking on the menu bar. By default, it will create a new configuration « main ». Click main click minus (-) button on top left to delete.

Click plus (+) button to add new and choose Python. Copy the code below for the script path and parameters. Note, replace the code based on the location of your file. Click apply and OK.
CONF
Script Path: /Users/alain/odoo/odoo/odoo-bin
Parameters: -c "/Users/alain/your_home/odoo.conf"

Run Odoo by clicking green arrow in the toolbar.

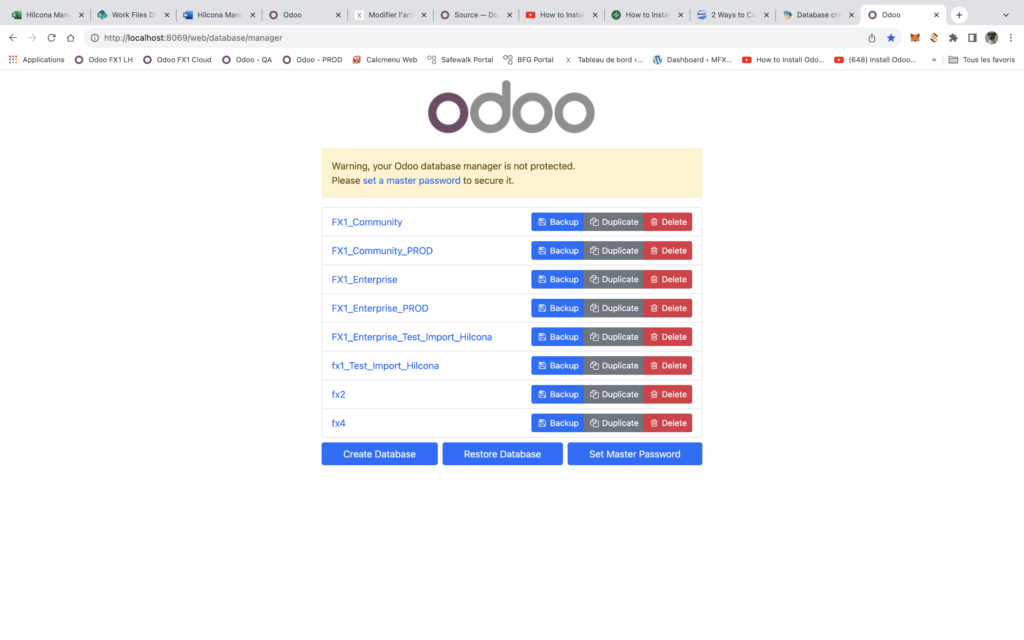
Go to the browser on type url http://localhost:8069. You will be redirected to http://localhost:8069/web/database/manager since there’s no database yet created.

Now that you have successfully run Odoo, let’s create a new database. The master password is the one you added in odoo.conf under admin_passwd which is 12345.

Click Create Database. You will notice in PyCharm log file that database and tables are being created. To verify if it is successful, go to pgAdmin 4, right click to databases and click refresh.
Going back to Odoo in the browser, you will be automatically redirected to Apps module. Search website and click install.

You will be redirected to website configurator http://localhost:8069/website/configurator. But since we will build a theme from scratch, click the link on the bottom right corner.
Since we did not added any theme yet, you will only see the default theme of Odoo. Hover to the theme and click Use these theme. It will take some time to install then you will be automatically redirected to the website home page.

Congratulations! You have successfully installed and run Odoo 16.
If you have deleted a db and cannot restart your remaining DB. You must recreate a DB via Terminal
How we fix database creation: error access denied odoo?
We saw what causes this error to occur. Let’s now see how our Support Engineers fix this error for our customers.
Recently, one of our customers approached us with the same error.
Our Support Engineers started troubleshooting the problem by checking if the admin_password in odoo.conf is correct. We saw the admin_password was displaying something like this,
admin_password = $pbkdf2-sha512$25000$15oTopRSSomREkLIeQ8hRA$QlTTxd4bqTTxSI0/u4g/yukO9jT2yFtTx4sAu46GtMKHnooPWTSo we won’t be able to know what is the DB-admin password.
But we can change it. So we changed it as below.
admin_passwd = 'new-password'Then we restarted the odoo server using the command,
service odoo restartAnd then we tried to recreate the DB again. This also didn’t work. So we checked for the parameters db_user and db_password in the odoo configuration file which is placed in /etc/odoo/odoo.conf.
The customer was using PostgreSQL with the specified user and password.
So we specified the same user and password in /etc/odoo/odoo.conf in parameters db_user and db_password.
Then we restarted the PostgreSQL using the command
/etc/init.d/postgresql restartFinally, this fixed the error.
In Pycharm – Modify the admin_password = Admin
Set your Master Password = Admin
If you are facing any issue – Check that all these packages have been installed in this folder
![[ F X 1 ] P H A N T O M ― Monitoring All transactions in the F&B Industry](https://fx1.tech/wp-content/uploads/2025/05/ChatGPT-Image-17-mai-2025-15_16_28-600x400.png)


RECENT POSTS